> ## Documentation Index
> Fetch the complete documentation index at: https://docs.cloudx.io/llms.txt
> Use this file to discover all available pages before exploring further.
# CloudX Agent
> Use the AI agent built into CloudX to analyze performance, manage monetization, run experiments, and get product help from anywhere in the Dashboard.
 # Overview
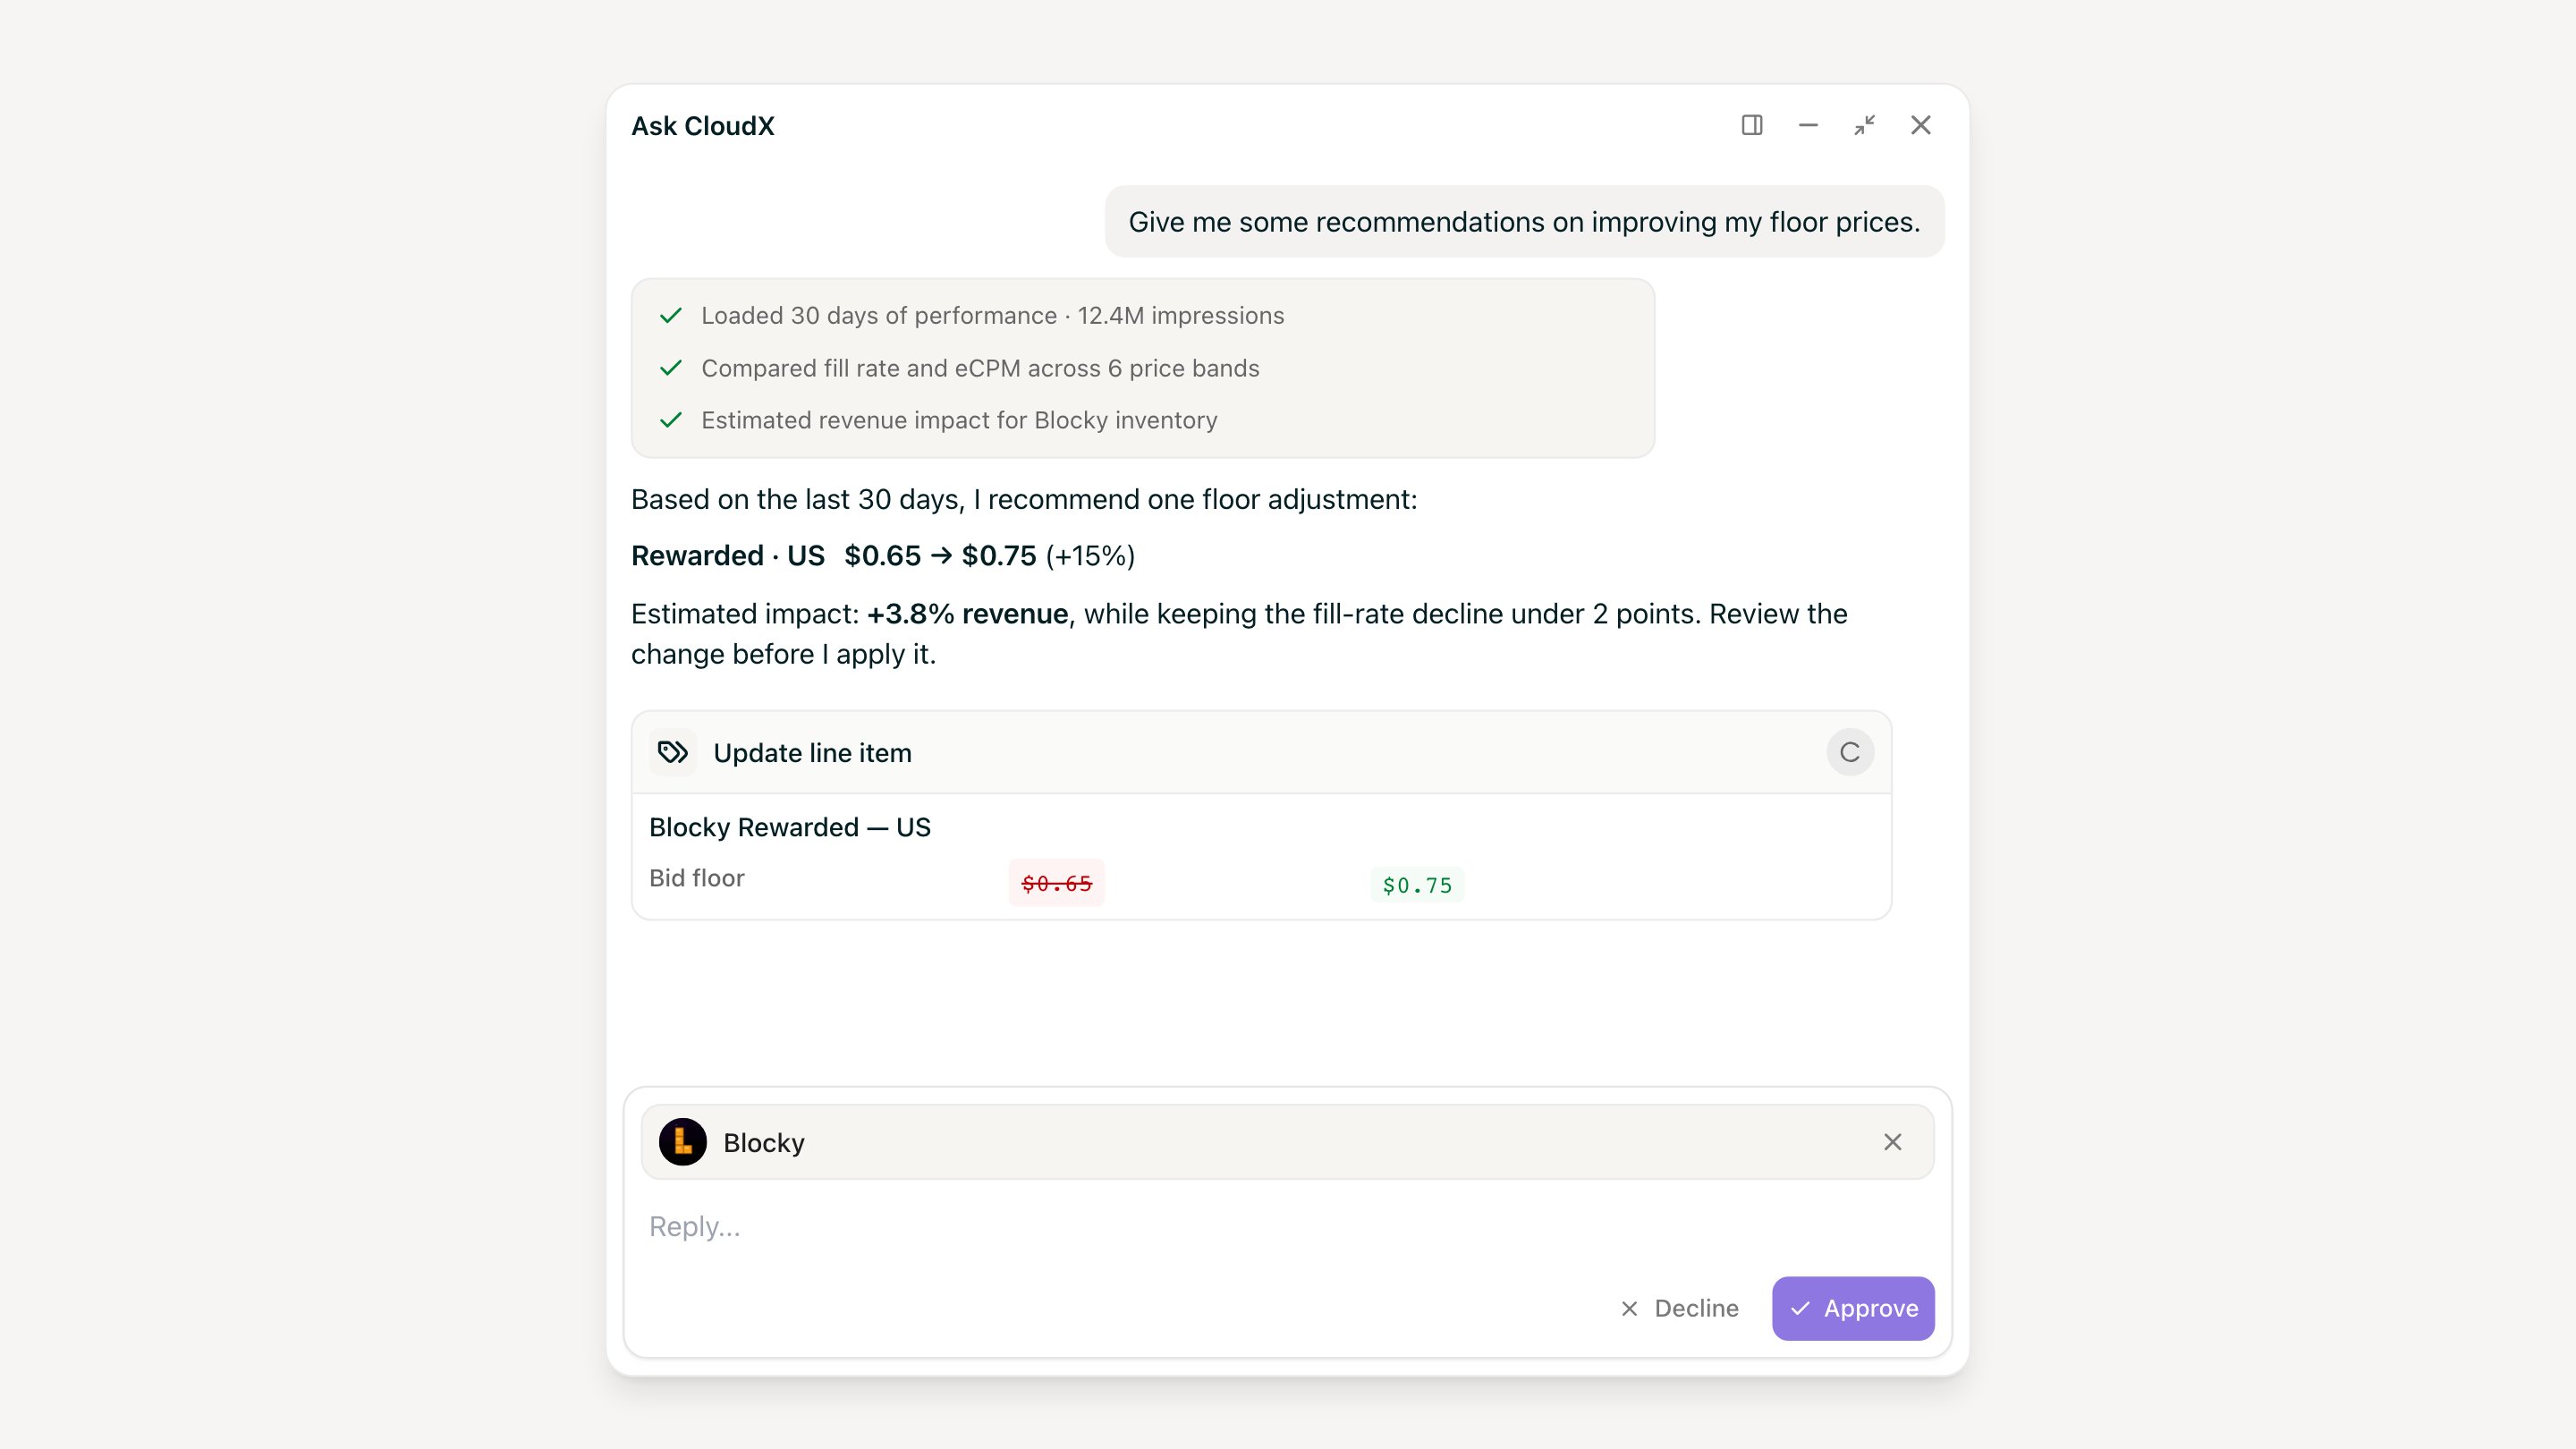
CloudX Agent is an AI agent built into the CloudX Dashboard. It can inspect your account's inventory, configuration, reporting, and auction data, then answer questions or prepare changes using the current state of your workspace.
Open **Ask CloudX** at the bottom of the Dashboard to start a chat. The agent follows you across the product, so you can ask about the app, ad unit, line item, A/B test, or report you are currently viewing.
Ask CloudX is free while in preview. The information and actions available to you depend on your CloudX role and account permissions.
# What you can do
Analyze performance and propose price-floor changes by ad unit, country, or ad format. Each proposed change shows the affected inventory and new values before it can be applied.
Create an A/B test, configure its test variant, start it, compare control and test results, end it, and promote the winning setup.
Review bidder performance, update bidder participation, and create or correct app-level and ad-unit-level network mappings as demand changes.
Investigate eCPM or fill-rate changes using reporting and auction data, identify likely causes, and prepare the smallest configuration change needed to address them.
Find configuration problems such as inactive line items, missing placement or network mapping IDs, incomplete ad units, and disabled or incorrectly configured test devices.
Trace published configuration changes to their timestamp, configuration version, author, and diff. Ask what changed to a floor, priority, mapping, or other inventory setting.
Upload a CSV, spreadsheet, JSON file, or other supported document. The agent can map it to your existing inventory and prepare a new or bulk configuration for review.
Ask about SDK installation, integrating an app, creating inventory, configuring pricing and demand, running an experiment, or any other topic covered in CloudX documentation.
# Work with page context
When you open Ask CloudX from a supported Dashboard page, the current entity appears above the message box. This context helps the agent understand references such as “this app,” “these line items,” or “the test variant” without requiring you to paste an ID.
You can remove the context before sending a message when it is not relevant. CloudX also provides suggested prompts based on the page you are viewing.
# Import inventory and configuration
Attach existing inventory or setup data to reduce manual configuration work. Ask CloudX supports images and common data and document formats, including CSV, XLS, XLSX, PDF, JSON, XML, and text files.
The agent compares the file with your current account before proposing changes. If a row is ambiguous, conflicts with existing inventory, or lacks a required value, it asks for clarification instead of guessing.
For a faster import, include stable identifiers, app bundle IDs, ad formats, bidder mappings, countries, priorities, and price floors where they are available.
# Review and approve changes
CloudX Agent can inspect and explain data without approval. Any action that changes monetization configuration requires an explicit review in chat.
Describe the outcome you want. The agent inspects the relevant live state and prepares a typed configuration change.
The approval card lists the action, affected entities, and field-level changes. Bulk updates are grouped so you can review their scope.
Approve to validate and publish the proposed change, or reject it to leave the configuration unchanged. CloudX reports validation errors or conflicts without applying a partial change.
After a successful update, the agent checks the resulting live state and summarizes what changed. The published configuration version remains available in configuration history.
Approved configuration changes can affect live monetization immediately. Review the entities and values in every approval card before applying it.
# Manage chats
Chats are saved to your CloudX account. The agent keeps earlier messages in a conversation and restores in-progress state after a refresh or reconnect.
## Change the chat layout
Use the controls in the top-right corner of the chat:
* **Dock to right** moves the chat into a right sidebar. Select **Undock from right** to return it to a floating window.
* **Minimize** collapses the chat to its title at the bottom of the Dashboard. Select the title to reopen it.
* **Maximize** opens the chat across the Dashboard content area. Select **Restore size** to return to the previous layout.
* **Close** removes the chat from the bottom bar without deleting a saved conversation.
## Open or search previous chats
1. Select the **Chat history** clock next to **Ask CloudX** at the bottom of the Dashboard.
2. Browse recent chats or enter part of a title in **Search chats**.
3. Select a chat to reopen it with its previous messages.
## Delete a chat
1. Open **Chat history** and point to the chat you want to remove.
2. Select the trash icon, then select **Delete** in the confirmation dialog.
Start a new chat when you want to work on a separate task or keep investigations independent.
# Overview
CloudX Agent is an AI agent built into the CloudX Dashboard. It can inspect your account's inventory, configuration, reporting, and auction data, then answer questions or prepare changes using the current state of your workspace.
Open **Ask CloudX** at the bottom of the Dashboard to start a chat. The agent follows you across the product, so you can ask about the app, ad unit, line item, A/B test, or report you are currently viewing.
Ask CloudX is free while in preview. The information and actions available to you depend on your CloudX role and account permissions.
# What you can do
Analyze performance and propose price-floor changes by ad unit, country, or ad format. Each proposed change shows the affected inventory and new values before it can be applied.
Create an A/B test, configure its test variant, start it, compare control and test results, end it, and promote the winning setup.
Review bidder performance, update bidder participation, and create or correct app-level and ad-unit-level network mappings as demand changes.
Investigate eCPM or fill-rate changes using reporting and auction data, identify likely causes, and prepare the smallest configuration change needed to address them.
Find configuration problems such as inactive line items, missing placement or network mapping IDs, incomplete ad units, and disabled or incorrectly configured test devices.
Trace published configuration changes to their timestamp, configuration version, author, and diff. Ask what changed to a floor, priority, mapping, or other inventory setting.
Upload a CSV, spreadsheet, JSON file, or other supported document. The agent can map it to your existing inventory and prepare a new or bulk configuration for review.
Ask about SDK installation, integrating an app, creating inventory, configuring pricing and demand, running an experiment, or any other topic covered in CloudX documentation.
# Work with page context
When you open Ask CloudX from a supported Dashboard page, the current entity appears above the message box. This context helps the agent understand references such as “this app,” “these line items,” or “the test variant” without requiring you to paste an ID.
You can remove the context before sending a message when it is not relevant. CloudX also provides suggested prompts based on the page you are viewing.
# Import inventory and configuration
Attach existing inventory or setup data to reduce manual configuration work. Ask CloudX supports images and common data and document formats, including CSV, XLS, XLSX, PDF, JSON, XML, and text files.
The agent compares the file with your current account before proposing changes. If a row is ambiguous, conflicts with existing inventory, or lacks a required value, it asks for clarification instead of guessing.
For a faster import, include stable identifiers, app bundle IDs, ad formats, bidder mappings, countries, priorities, and price floors where they are available.
# Review and approve changes
CloudX Agent can inspect and explain data without approval. Any action that changes monetization configuration requires an explicit review in chat.
Describe the outcome you want. The agent inspects the relevant live state and prepares a typed configuration change.
The approval card lists the action, affected entities, and field-level changes. Bulk updates are grouped so you can review their scope.
Approve to validate and publish the proposed change, or reject it to leave the configuration unchanged. CloudX reports validation errors or conflicts without applying a partial change.
After a successful update, the agent checks the resulting live state and summarizes what changed. The published configuration version remains available in configuration history.
Approved configuration changes can affect live monetization immediately. Review the entities and values in every approval card before applying it.
# Manage chats
Chats are saved to your CloudX account. The agent keeps earlier messages in a conversation and restores in-progress state after a refresh or reconnect.
## Change the chat layout
Use the controls in the top-right corner of the chat:
* **Dock to right** moves the chat into a right sidebar. Select **Undock from right** to return it to a floating window.
* **Minimize** collapses the chat to its title at the bottom of the Dashboard. Select the title to reopen it.
* **Maximize** opens the chat across the Dashboard content area. Select **Restore size** to return to the previous layout.
* **Close** removes the chat from the bottom bar without deleting a saved conversation.
## Open or search previous chats
1. Select the **Chat history** clock next to **Ask CloudX** at the bottom of the Dashboard.
2. Browse recent chats or enter part of a title in **Search chats**.
3. Select a chat to reopen it with its previous messages.
## Delete a chat
1. Open **Chat history** and point to the chat you want to remove.
2. Select the trash icon, then select **Delete** in the confirmation dialog.
Start a new chat when you want to work on a separate task or keep investigations independent.